|
User manual (See usage example)
|
Button
|
Function
|
|

|
Power : Power on and off.
When using the built-in battery, the auto-off function operates after about 90 minutes.
To turn on, press the power button for more than 1 second.
|
|
L / C
|
Switch between Lx and Cx modes. Always start in Cx mode after power up.
|
|
Large L
|
In Lx mode, bulky inductors are measured with this button. (Single shot) ※ See
|
|
CAL
|
Calibration : Cx is the measurement terminal open and Lx is a short. close to zero.
|
- The rechargeable battery holder (Li-ion 18650) is on the bottom and the DC power (USB C Type 5V) jack is on the back.
- When the POWER SWITCH is pressed, the model name is displayed on the display window, and the capacitor measurement mode (Cx) starts after automatically performing initial calibration after booting. Cx 0.00 pF (or ±0.01)
- When measuring small values precisely, you can get good results by referring to the examples on the website.

Capacitor (Condenser) Measurement
When measuring a capacitor of less than 100pF precisely, wait for a while after turning on the power, press CAL, check Zero, and start measurement.
In capacitor mode (Cx), calibration is performed without connection to the probe (open).
If the probe is changed, the floating capacitance will change and a calibration (CAL) will be required again.
The measuring range is 0.1 pF to 9.9 μF.
Capacitance Mode Calibrate (Please Open)

Input Probe Open
|
Capacitance Mode Calibration
Open and press the CAL button to calibrate.
|

|
↓
-0.01 ~ 0.00 ~ 0.01 pF
※ Caution: Be sure to discharge the residual charge of the capacitor before measuring.
Especially when capacitors are used, if they are not discharged, the input components may be damaged by high voltage.
1.005 μH

Inductor (coil) measurement
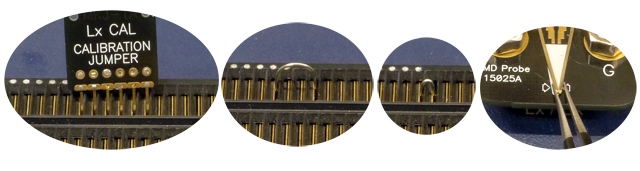
The length of the calibration jumper must be taken into account when measuring the range of small values from 1 nH to 1.999 μH. (see detailed example)
The measuring range is 1 nH to 500 mH.
Small amount inductors for PCBs have relatively small parasitic capacitance and therefore do not affect their value. However, bulky inductors increase the area between the windings and because of their large parasitic capacitance, they act as capacitors in resonant circuits, displaying large inductance values. In this case, use Large L mode.
In Large L mode, connect the inductor in Lx mode and press the Large L button to display the measurement result minus the parasitic capacitance. Only single-shot measurements are possible in this mode. (Single-shot measurement: Each time an inductor is inserted and the Large L button is pressed, one measurement is taken and the display is fixed.)
If you switch to Lx mode
No coil is displayed because the inductor or jumper is not connected yet.
Calibration (CAL) in inductor mode (Lx) is performed by shorting a jumper on the probe.
Inductance Mode Calibrate (Please Short)
Input Probe Short
|
Short the measuring terminal (jumper) and press the CAL button.
※ 0 nH based on jumper length.
|

|
-001 ~ 000 ~ 001 nH
Large L measurement (calibration is not required)
In this mode, just press the Large L button after connecting the inductor to get the result.
It is a single measurement and the display is Hold. Hold is displayed on the right.
10.03 mH (Large L mode ; Hold)
※ Large inductor: The larger the coil area and the larger the number of turns, the larger the parasitic capacitance.
In this Large L mode, the inductance value with the parasitic capacitance removed is displayed.
CAL (Calibration)
Perform zero calibration before measurement.
Measure after pressing the CAL button so that the display is close to zero.
In case of Lx, the measuring terminal is short-circuited, and in case of Cx, calibration (CAL) is performed in the open state.
Last Digt ±1 (0.00 pF or -0.01, 0.01, 0 nH, -1nH, 1nH) Calibration
For precise measurement of very small values,
it is necessary to set the LC resonance circuit for at least 10 minutes after the power is turned on.
Many temperature changes in the measurement environment may require more frequent calibration.
※ This LC METER is capable of stably measuring a very small capacity in a place where there is no change in temperature.
※ When measuring nH, 0.1pF or less, it may take about 2~5 seconds to change the mode or to stabilize the resonance frequency when measuring inductance.
Power
5V is used for power, and a rechargeable battery (Li-ion 18650 1 Cell (3.7V(4.2V))) is used.
Automatic charging of internal Li-ion with 5V power supply.
DC 5V 500 mA : C type USB Jack (No Auto Power OFF) ; Use external power if continuous use is required.
or Li-ion 18650 1 Cell (3.7V(4.2V)) (Charging when using an external power source) ; Auto Power OFF
|
It is the most practical inductance and capacitance meter in the laboratory.
|

Measurement example
0.001 μF = 1.000 nF = 1000 pF
|
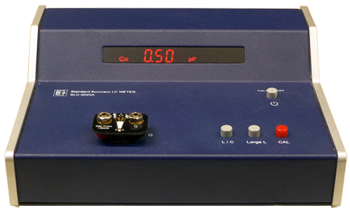
Standard Accuracy LC Meter SLC-5020A

|
|


